
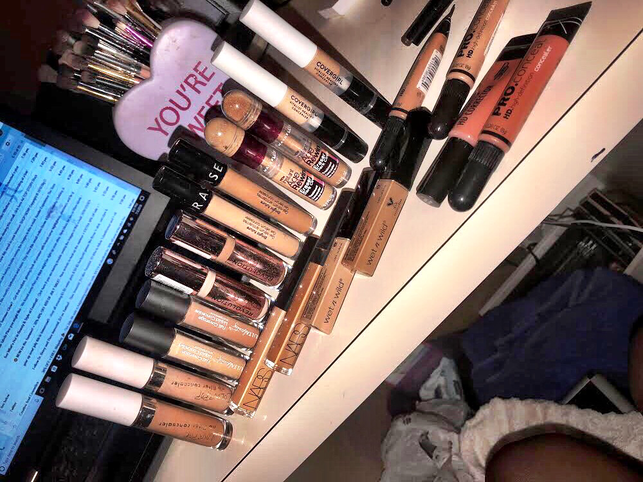
 Concealer is a major part of my collection because at times I only apply concealer when doing a full face of makeup. Foundation sometimes gets on my nerves and I don’t want to do that extra step honestly. Or I’m just lazy. I use my skin tone concealer to conceal my dark circles under my eyes and then I used a shade that is either one or two shades lighter than my complexion. PSA: THERE IS NO NEED TO GO 5 to 10 shades lighter. You don’t want to look like no clown and flashback is not forgiving at ALL. But I would use a light concealer to play as my eyeshadow base. But not to highlight my forehead or undereye or Brows. IT does not look natural. At least with a shade one or two shades lighter it’ll look like a natural glow and high light. Currently, I don’t have a favorite concealer right now. I normally reach for my NARS Radiant Creamy Concealer, but I’ve run out of my natural shade and I don’t feel like spending $36 bucks right now. But I did find a couple replacement concealers that are drug store based and work just as well with my makeup application. 1. Makeup Revolution London- Conceal & Define- Full Coverage conceal and contour 2. Maybelline Instant Age Rewind Eraser Dark Circles 3. Covergirl Vitalist Healthy Concealer 4. Wet N Wild Photo Focus Concealer 5. Colourpop No Filter Concealer All of these are drug store brand concealers that are affordable. I feel like you don’t have to spurge all the time when there are affordable brands that are offering the same coverage as high end. Below I have a Step By Step of how you should apply your concealer to your undereye and what beauty tool to use. What you’ll need: 1. Concealer 2. Sponge (Damp) or whatever you use to blend out concealer 3. Setting Powder of your choice •First apply concealer undereye by creating lines. Some people use the triangle method, but I feel that wastes a lot of your product. We want to use the least amount of product but also have that full coverage aspect.
•Step2: take your beauty tool of choice, mine is the Real Technique Sponge (damp) and I start to blend upward. Then pressing the concealer into the skin and spreading it undereye. Do this to both sides until your concealer is blended out perfectly. Add another layer if you haven’t reached your desired level of coverage. •Step 3: this step is optional. Apply your lighter concealer on top and repeat the same steps you did in step 2. •Step 4: Choosing setting powder of your choice, dip your damp sponge or brush into the powder and press into the areas you applied the concealer. This will help set the concealer in place and it wont move around or disappear throughout the day. If you’re choosing to bake with your setting powder, I recommend 5 minutes. That’s my personal time limit because the last time I baked for longer than 5 minutes. I was Casper’s sister. And don’t forget to set your face with your setting spray!!! That can help when you feel your face is TOO dry from baking. It can put moisture back into your face. My concealer collection isn’t as bad as my brush collection and lipstick collection. But once I find a good thing with a concealer I don’t venture out too much because I don’t want to lose that friendship by inviting new products in that may not work quite as well. This may be the most boring part of my collection…lol But I promise the What’s in my Makeup Collection Series will be Better!!! Thank you Beautei’s for tuning in this week. I know I’ve been a step behind in my post but I’m working out my time to get these blogs up and ready for you every Wednesday, along side my live makeup looks at 8:45pm. As always if you have any questions, comments, or concerns Please hit me up!!!! I am here to help. ***Disclaimer I am not paid by these brands or get anything from them. These are my personal products that I buy, and I just love them I promote them for FREE. Because everyone needs a staple in their makeup kit*** IG: @mrsamakeup_ Xoxo Mrs. A
0 Comments
Leave a Reply. |
AuthorWrite something about yourself. No need to be fancy, just an overview. Archives
November 2018
Categories |


 RSS Feed
